How great to make a salad of self-grown tomatoes. It is not only tasty, but also useful. However, not all of us have a summer cottage where this can be done.
But there is a great solution - growing tomatoes in bottles. In the article you will learn about the features of such cultivation, and more precisely about the pros and cons of this method, how to properly prepare the container and seeds before planting, and how to take care of the tomatoes in the future.
Description of the bottle system
Tomatoes in bottles is a new way of growing tomatoes. It is effective and economical, allows you to get quality material for planting. Seeds are germinated not on the soil, but on toilet paper. Due to this, the sprouts are easier to dive and plant in open ground. But if you do not have a land plot, then it does not matter - you can continue to grow tomatoes right in the bottle.
Advantages and disadvantages
 The advantages of such cultivation include:
- efficiency of used space;
- favorable environment for germination;
- sprouts do not interfere with one another;
- no damage to the roots when diving;
- easier to grow at home;
- no need to purchase soil;
- cleanliness in the room where tomatoes are grown;
- hygiene method.
At the same time modern gardeners have not yet revealed the shortcomings of such cultivation.
Training
What are suitable containers?
For growing in a bottle, an ordinary transparent plastic bottle will do. The capacity of such a bottle can be from one and a half to five liters. It must be clean.
Seeds
Selection
For sowing need to use large and dense seeds. They are selected manually or using a special solution. Salt is added to water, it is well dissolved and seeds are poured into this liquid from the package. Hollow and small seeds, unsuitable for cultivation, will immediately float. They can be thrown away. A good seed for sowing will remain at the bottom. They need to be used.
Disinfection
Selected seeds are soaked for 20 minutes in a manganese solution. This makes it possible to kill the bacteria and fungus that are in the seed coat.
To improve seed germination, you can soak them in any growth stimulator and leave it for 10-12 hours.
For more information on how tomato seeds are generally treated before sowing, read here.
The rest of the material
It is also necessary to prepare:
- plastic wrap or bags - they are cut into strips 10 cm wide;
- toilet paper.
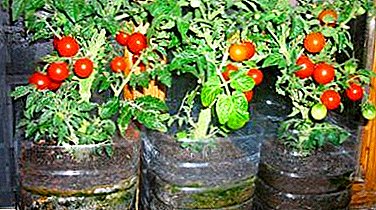
Planting tomatoes in 5-liter bottles from under the water
 The advantage of planting tomatoes in five-liter bottles is that grown seedlings can not be planted in the ground, but continue to grow tomato bushes in the bottle itself, avoiding picking.
The procedure consists in the following actions:
- For planting cut in half a bottle of 5 liters.
- Put 2 cm of crushed eggshell on the bottom.
- Top with 2 cm of sand.
- Add ground 10-12 cm above the sand.
- Steam the earth with boiling water, not pouring it. Let it cool.
- Spread tweezers evenly seeds (20 seeds per bottle).
- Sift the compost and sprinkle them with seeds.
- Cover with a plastic bag and put in a warm place.
- When the first shoots appear, remove the bag and move the container to a bright place (on the window).
- Watering as needed depends on the growth of the seedlings. About once every five days.
- Periodically turn the container in different directions.
- The earth will sink. Therefore, as necessary, pour soil.
- Next, seedlings can be planted in open ground, and you can continue to grow in a bottle.
- Before planting the flower bed, get the seedlings out of the bottle.
- Rinse the roots with water.
- Land in open ground.
How to grow in a 1.5-liter capacity?
How to plant in a 1.5-liter capacity? There are two ways of growing in such a container: horizontal and vertical.
For growing in a half liter bottle you need:
- toilet paper;
- plastic bag (better garbage);
- 1.5 liter bottle with a cropped neck.
With vertical cultivation, you need to perform the following actions:
- Cut packages into strips 10 cm wide.
- Toilet paper cut off strips of the same length as the packages.
- Put the paper on top of the bag and moisten with water.
- Spread the seeds on paper with a distance of 4 cm between them.
- Collapse the resulting strip roll. The diameter must match the diameter of the bottle.
- Pour 3 cm of water into the bottle.
- Put the bottle in a well-lit place.
With horizontal cultivation:
- Cut the bottle along.
- To lay on the bottom of several layers of toilet paper.
- Place the seeds between the layers.
- Dampen paper with water.
- Close the halves of the bottle with polyethylene and place in a well-lit place.
- No need to water, as created greenhouse effect.
How to care for seedlings?
Watering and fertilizer
 To irrigate gently, not abundantly, so as not to form porridge.
After the appearance of the leaves can be fed with mineral fertilizers. To do this, there are special substances that you can buy at any garden store or make your own.
- When the first seedbed leaf appears, copper is used. Half a teaspoon of copper is dissolved in five liters of water.
- After the second leaf appears, urea is used to improve the quality of the green mass. To do this, take half a tablespoon of urea per five liters of water. Dilute the solution and sprayed with sprouts.
- Then, as the third cotyledon leaf appears, it is necessary to move on to the next stage — a dive.
Picking
- Carefully remove the sprouts. If this is a vertical way, then the rolls unwind and carefully take out one sprout. With horizontal cultivation, simply remove the shoots from the paper.
- Next, you need to transplant 2 shoots into separate pots. Peat is best for this process.
- After that make transshipment in open ground.
Before the dive procedure, it is necessary to prepare the ground. The most suitable composition should include:
- 3 parts of land, peat, compost;
- 0.5 parts of sand;
- 1 part wood ash.
All components are thoroughly mixed, steamed with boiling water or calcined in an oven at 200 degrees for one hour. So the disinfection of the soil takes place. Next, you need to leave the sanitized soil for a week to restore the nutrient microflora.
Before planting make nitrofosku, which is diluted according to the instructions. It is a mineral fertilizer that strengthens growth, stimulates development and provides a healthy harvest.
Moving to the ground
Repot after the appearance of three normal leaves on the stem.
- To do this, you need to dig shallow pits, pour 2-3 liters of water into each and put a bush there.
- Then sprinkle the bushes with earth. No need to then water the bush from above.
- Around it is imperative to make a hole so that during watering the water does not flow.
What result to expect?
A big harvest of juicy, fragrant and tasty tomatoes is the result you get by following all the rules of cultivation and care.
Common Errors
Beginners gardeners can make mistakes that can lead to the loss of planting material, and because of the harvest itself. The most common ones are:
- excess moisture;
- overdose of fertilizers;
- lack of lighting;
- root damage during transplantation;
- use of poor quality soil.
Growing tomatoes in a bottle is a completely new and easy way to get your own crop at no extra cost.