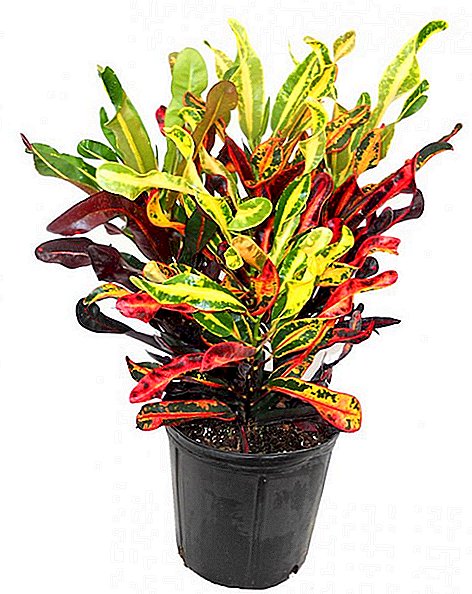
Croton, also known as Codiaeum, is known to gardeners as one of the most beautiful, but at the same time capricious and demanding indoor plants.
It is very difficult to create conditions in which this tropical flower will retain its inherent decorativeness, will not become sick, dry and wither, therefore, it is usually not a matter of trying to propagate it at home.
However, for those who are not afraid of difficulties and want to try their hand at solving a difficult task, this review contains a detailed step-by-step guide to the reproduction of codeioum.
Suitable Croton Breeding Period
To understand what time of year is best to choose for breeding codiaum, you need to carefully examine the optimal conditions in which young plants will be able to properly and quickly grow.
Read more about how to properly care for the Croton at home.
Practically any seedlings at the initial stage of its development need good lighting. The temperature of the air can vary depending on the age of the seedlings, but without enough light, they stretch, rot and get sick. So, no matter what method of reproduction will be chosen, this procedure should be carried out at a stage when the length of daylight hours is long enough.
At the same time, excessive heat, dry air and scorching sun are stressors for any representative of the flora, and for Croton, whose tropical and subtropical forests are native, this rule is of particular relevance. Therefore, despite the fact that daylight in our latitudes reaches its maximum in June, this period for growing young codiami is not the most successful.  Thus, choosing the "middle ground" between good lighting and gentle air temperature, flower growers agree that the best time to start the croton breeding procedure is from late February to mid-March. Planted at this moment, young plants will have the opportunity to grow and take root under the rays of the sparing, but at the same time already quite bright spring sun, and by the time of the onset of hot days they will have time to get stronger.
How to propagate Croton at home
There are two ways to produce young Crotons - vegetative and seed. At home, it is best to use the first option, which, in turn, may consist in rooting the leaf, cuttings or air layering. Sowing seeds is a more laborious and time consuming process, but you can use it if you wish. Having studied all the mentioned methods, everyone can choose for themselves the most suitable.
Leaves
This method is a type of grafting, with the difference that a part of the stem is selected for rooting with an adult leaf preserved on it. In addition, at least one kidney should be present on the handle below the leaf.
Did you know? There is some confusion associated with the origin of the name “codiaeum”: in Indonesia, where this plant was first discovered by Europeans, the aborigines called it “codibo”, but later the Latin name of the plant that arose in this way was mistakenly associated with the ancient Greek word “codeia” - the head.
Follow the procedure as follows:
- Select a suitable fragment on the plant. It is better to cut the stalk at the top, making sure that there is no damage on it, and the stem, leaf and kidney are completely healthy.
- Use a sharp and clean knife to cut the cutting at an angle of 90 °.
- Carefully roll up the sheet and tie it with a strong thread to reduce the process of evaporation of moisture through the sheet plate.
- Leave the cutting for a few hours in a shade and a place protected from moisture so that the cut is completely dry.
- Prepare a tank for landing. To do this, you can use a single cup, having previously made drainage holes in it to remove excess water, or, if the cuttings are cut off, a box with low sides.
- Mix in equal parts peat and river sand, fill the prepared container with the obtained substrate.
- Abundantly pour the soil, ensuring that the remaining water was removed from the pan.
- Dig a cutting with a leaf into the soil mixture in such a way that the sleeping kidney is in the substrate.
- To create a permanent microclimate and prevent overdrying of the shoot, cover the container with a plastic bag or film.
- Place the pot in a warm place, protected from bright light. The optimum air temperature at the first stage of rooting is + 23… + 25 ° С.
- Under properly created conditions, the shoot creates its own root system in 4-6 weeks. During this time, the care of the cutting is the periodic airing and spraying of the sheet and the surface of the substrate. Water should be soft and slightly heated. As an additional stimulation, you can add a little aloe juice to it.
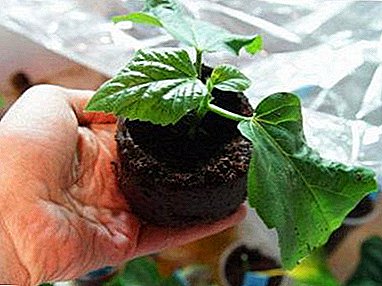
- The signal for the completion of the "greenhouse" period is the appearance on the cuttings of young leaves. At this point, the plant, with the utmost care, should be transplanted into a permanent pot.

Cuttings
Croton grafting is approximately the same pattern as leaf reproduction, but in this case a longer stem is used for planting, and the leaves that are present on it are removed.
When choosing a cutting should consider such recommendations:
- the fragment, if possible, should be an adult, as the young shoots are more susceptible to rotting;
- the presence of the first signs of stiffness on the handle is allowed, but too old shoots for rooting are still better not to use;
- The length of the cutting should be about 10 cm (some use longer shoots, but they take root somewhat worse);
- the maximum number of buds on the handle is three, the minimum is one (the last option is more risky: if the bud is not viable, the cutting will not take root).

After the stalk is selected, proceed as follows:
- Wear protective gloves (croton is a poisonous plant, and in the process of working with a hand stalk, it is better to protect it from contact with the juice that comes out of the stalk).
- Separate the cutting from the parent plant (as in the case of leaf propagation, the cut should be done strictly at right angles).
- Cut the leaves on the handle, taking care not to damage the bud.
- Rinse off the milky sap with a soft, warm water, protruding at the cut-off point.
- Washed "wounds" gently sprinkle with powdered charcoal (if not, you can use the usual activated).
- Place the cuttings for a day in the solution of the rotor. For this purpose, you can use different means - humates, honey or special preparations, for example, "Kornevin", "Epin", "Heteroauxin", "Charkor", "Radifarm", etc.
Important! When deciding on the choice of cutting method, it should be borne in mind that when rooting the cutting in water, the entire breeding process takes much longer. The fact is that young roots, which are formed in water, after placing a process in the ground, still do not survive and are replaced by new, stronger roots.
In the ground
The procedure for rooting the cutting in the soil is completely analogous to rooting a process with a leaf and includes the following steps:
- Preparation of the tank with the obligatory presence of drainage holes.
- Filling the tank with a mixture of peat and river sand. For additional protection against waterlogging, a layer of expanded clay or small stones as a drainage can be laid out at the bottom of the tank.
- Substrate moistening.
- Deepening cuttings in the sand-peat mixture.
- Shelter capacity protective film.
- The room planted cuttings in a warm place with a diffused light.
- Airing and spraying shoots at the stage of germination.
- Transplantation of young plants into individual pots after the appearance of new leaves on them and further re-growth without film cover.
In water
It makes sense to use this method if cutting is carried out in summer or in winter, when the room is heated too much, and as a result the air in it is very dry and warm.

To rooting was better, you need to act as follows:
- Fill the prepared glass with warm distilled water so that the liquid level is no more than 2-3 cm.
- Make a mark on the outside of the glass, indicating the level of liquid in it (this will control the amount of water and replenish it as it evaporates).
- Lower the stem into the container (for each process it must be individual), and only the lowest part of the stem should be in the water, but the kidneys should remain dry. The first root processes in this case appear above the surface of the water, it will save them from rotting and make them stronger.
- When the roots reach a length of 2-3 cm, move the cuttings into a container with a wet mixture of peat and sand.
- Cover the shoot with a film and place for full rooting in the same conditions that are created for the germination of cuttings without roots.
Important! Water temperature for germination of croton cuttings should be in the range of + 25 ... + 27 ° C. In a colder environment, the shoot does not take root for a very long time, and in a too warm environment it is affected by bacterial infections, rotting and dying.
Air layouts
This method is not a reproduction of Croton in the strict sense of the word. As a result of its implementation, it is almost never possible to obtain several new plants from one, but you can fully rejuvenate a bush if, due to illness or improper conditions of maintenance, it shed leaves and lost all its decorativeness. For the rest, it must be admitted that of all the possible methods of growing young Croton, the use of air slips is the fastest and most reliable.
Rooting air slips is carried out in the following sequence:

- Stepping back from the top of the codiam about 15 cm, make a neat cut on the bark at an angle of 45 °. Its length should be about 30 mm, depth - 30% of the thickness of the stem. Some experts, instead of a single incision, remove the entire area of the bark around the perimeter of the trunk, this method is also acceptable.
- Slightly opening the edges of the incision, using a cotton swab, powder the exposed tissue with powdered growth stimulant - or, if it is not there, pounded charcoal for disinfection - then place a broken match or a toothpick inside to prevent the wound from drawing out.
- If the stalk of an adult Croton is long enough, and there are practically no leaves on it, you can perform the same procedure again, moving a new 15 cm down from the place of the upper layer. In this case, indeed, you can get several young plants from one mother bush. The same method should be used if the parent plant has several independent shoots.
- To powder the cut (or bare bark) with a powdered root formation stimulator.
- Wrap a portion of the bark, on which the cut was made, with a thick layer of well-moistened sphagnum moss, wrap the cling film over the resulting pillow and secure it to the top and bottom with a thread or wire. Instead of sphagnum, you can use peat or perlite.
- Over the next 5-6 weeks, if the air in the room is very dry, from time to time it is necessary to remove the upper part of the reinforcement from the “cuff” and moisten the nourishing pillow under the film with a spray bottle.
- After the next removal of the film under the sphagnum reveals young roots that have reached a length of not less than 5 cm, carefully remove the remnants of the cuff and cut a layer below the root formation point by 10-15 mm with a clean, sharp knife.
- Drain the obtained otvodku in a well-moistened mixture of sand and peat.
- Without covering the container with a film, place it for rearing in a slightly shaded place with an ambient temperature of + 23 ... + 25 ° С.
- Till that moment when a young plant launches new shoots, care for it consists only in regular and abundant spraying (it is necessary to moisten both the cuttings and the soil surface).
- After rooting is complete, the Croton tank can be placed under normal conditions for further maintenance.
Did you know? The largest Croton collection is in the US state of Florida: for almost seventy years a nursery has been operating there, where you can see more than 500 species of this tropical plant.
Some flower growers make cuffs for rooting the croton's airborne layers from trimming a plastic bottle, putting it on the plant from the top, like a ring, and filling the free space with sphagnum.
Seeds
Of all the possible ways of propagating codiame, this is the most difficult. Among its other drawbacks, it should be noted that seed reproduction is not suitable for hybrid varieties of croton, since the seeds obtained from hybrids do not inherit their characteristics.

Instead of the expected rare codiaeum variety, having spent a large number of forces on seed germination, you can end up with the most common flower. Given this circumstance, such a method can be considered justified only in the case of purchasing ready-made seed material in specialized stores; if the mother plant is available, it is better to propagate it by cutting.
The step-by-step process of growing croton from seeds looks like this:
- Prepared seeds pour hot water and leave for half an hour.
- Dilute any growth stimulating agent in water (examples were listed above) and soak the swollen seeds in the resulting solution for another 24 hours.
- Mix sand and peat in equal parts and fill the box with low sides with the obtained substrate, not forgetting to make holes in its bottom to remove excess water. From the surface of the soil to the side of the tank should remain at least 2-3 cm.
- Well moisten the substrate.
- Put croton seeds on the surface of the soil mixture.
- Add a layer of moistened sand-peat substrate to the drawer with a thickness of not more than 1 cm.
- Without watering the ground, cover the box with a film to create a greenhouse effect.
- Place the container in a place with bright but diffused light and air temperature + 23 ... + 25 ° C.
- During the first two weeks (namely, after such a period of time, the first shoots should appear) from time to time, air the seedlings and moisten the surface of the substrate with a spray bottle. Do not forget to defend and slightly heat the water before spraying.
- After the sprouts appear, remove the film (it is better to do this gradually, increasing the airing intervals so that the young sprouts do not get too much stress from the abrupt change of the microclimate).
- When young codiaeums grow to the level of three true leaves, they can be transplanted into individual pots and grown as well as rooted cuttings.
Important! The seed germination of the codiaum is preserved during the first year after harvest, therefore, they should be sown as soon as possible.
Transplant features
Transplantation is a great stress for any plant, and the capricious Croton tolerates this procedure especially hard. For this reason, it is very important to select a container for a flower, including a very young one, so that the codiaum does not feel closely in this container for at least two, preferably three years.

After the flower reaches full maturity, it should be replanted at all no more than once every 4-5 years, only for the rest of the time replacing the top layer of earth in a pot with fresh soil mixture. With rare exceptions (these include cases of damage to the plant by root rot or pests living in the soil), croton needs to be transplanted by transshipment method, not baring the root system and simply moving the earthen clod into a more spacious container with subsequent compaction of the free space with fresh earth.
As in the case of reproduction, the optimal time for codiam transplantation is the end of February or the first half of March. During this period, abundant sap flow begins, the plant from the rest period moves into the vegetation phase, and it will not be so difficult for it to survive the stress.A crockery pot that does not tolerate stagnation of moisture in the roots is suitable for a high pot, 30% filled with expanded clay or gravel as a drainage layer. As for the volume of the tank, the standard rule applies here: the diameter of a new and old pot should differ on average by 20 mm.
Important! The more large-leaved is the appearance of the croton, the higher the rate of its growth, therefore for such varieties the pot can be taken larger.
To the quality of the land codiaeum is quite demanding. The flower is suitable well-drained, light and humus-rich soil with a weakly acidic reaction (pH about 5.5). It is this composition that usually have ready substrates for decorative leafy plants, sold in flower shops.
If you wish to prepare the soil mixture yourself, you need to mix peat, sand, sphagnum moss and humus with leafy or soddy soil, enriching the resulting substrate with a small portion of charcoal. An interesting feature of the codiam is this pattern: the smaller the flower, the less it needs soil and the better it grows in a mixture of peat and sand.
Aftercare
Caring for Croton involves the following conditions:
| Air temperature |
|
| Humidity |
|
| Lighting |
|
| Watering |
|
| Top dressing |
|
| Pruning |
|
Common plant propagation errors
Among the main mistakes made by inexperienced flower growers when trying to propagate a codiam, the following should be mentioned:

- Bad time. With insufficient lighting or too high a temperature, it will be difficult for a young plant to develop, and it will die with a high probability.
- Bad place. Both the cuttings left for rooting, and the sprouting seedlings, and the air slips are defenseless against direct sunlight, so they definitely need to shade. In addition, the temperature regime at the first stage of plant formation is very important: it can be killed with the same success by excessive heat, cold and draft.
- Dry air. In order for a plant that comes from the tropics to take root and grow stronger, it needs a constant microclimate and a regime of very high humidity. Therefore, the creation of the greenhouse effect with the use of the film in the process of cuttings, as well as in seed growing of the codiame, is mandatory.
- Incorrect soil mix. Croton rooting best occurs in a mixture of sand and peat, the earth is poorly suited for this purpose.
- Incorrect rooting of cuttings in water: excessive deepening of the appendix in the liquid, violation of the temperature regime, etc.
- Using a blunt knife for cutting cuttings or air layering.
- Ignoring the disinfection process (tool and cuttings) and stimulate rooting.
- Leaving an oversized leaf on the handle without folding it up into a tube.
- Violation of the terms and conditions of storage of seedsthat precludes their germination.
- Excessive penetration of seeds into the ground during planting.
- Planting young plants in too small or too large pots - in either case, the development of the croton will be disrupted.
- Non-compliance with safety regulations when working with a poisonous plant.
Did you know? At home, codiaum almost never blooms. And this is very good, because, according to esotericists, such a phenomenon should be considered as a warning that something unpleasant could happen in the life of the inhabitants of a room in which croton blossomed.
Pests and plant diseases
Due to the fact that the microclimate in the living room is very different from the conditions in which croton grows in the wild, codiaum, grown as an indoor flower, is constantly in a state close to stressful, and for this reason often becomes a victim of various infections and pest attacks. For young plants, such misfortunes are especially dangerous, so it is very important to detect and neutralize them in time, and even better to prevent them.

Below are the most common problems in growing croton, as well as measures to eliminate them:
| Symptom | First aid |
| Dropping leaves across the entire stem height |
|
| Crushing and deformation of leaves |
|
| Monochromatic leaf color |
|
| Brown spots on leaves |
|
| Drying leaves starting from the tips |
|
| Black spots on the leaves and stem |
|
| Root decay |
|
Fortunately for codiam, its poisonous milky sap is a reliable natural defense against most harmful insects and mites, but sometimes the plant is still exposed to a shield and spider mite. And in fact, and in another case, the flower should be thoroughly treated with soapy water, if necessary, repeating the procedure 2-3 times with an interval of several days. Usually, such measures are sufficient, but if they have not yielded an effect, the next step may be the use of insecticidal and acaricidal agents (Anticlesch, Fufanon, Fitoverm, etc.).
Important! The variegation of leaves, characteristic of croton, is inherent only in adult plants, therefore, having discovered uniform green shoots, one should not be upset: in time, the flower will necessarily acquire the expected decorative effect.
So, despite all its capriciousness, Croton breeds not much harder than any other indoor flower. However, a young plant that has passed the initial stage of rooting will need to provide a special microclimate as close as possible to its native tropics. Only in this case, the codeieum will be able to demonstrate that unusual and bright coloring of the leaves, which makes it so popular with gardeners.