Progress gave us a lot of household appliances and other devices, without which a modern home is unthinkable. Most of them are powered from the network, and then there is a dilemma: to buy "tees" with extension cords, which by their appearance spoil the interior or put up additional sockets. Let us dwell on the second variant, finding out all the nuances of such works.
Choosing a place
The first step is to determine the place of installation. That is, even before the start of work, they calculate how to distribute the sockets. It all depends on the type of room.
- So, in the bedroom and living room sockets are usually laid on both sides of the bed or sofa, as well as at the chairs. If we talk about a sofa or a bedside table, then there will be several outlets by the way, united in one unit (for charging the phone and other equipment). The same applies to the living room, where a TV or aquarium with a compressor will be placed.

- Study. The main location is near the table. Multiple connectors will be enough. But there are some nuances. For example, the lower level is better for the computer, and for laptops or tablets it is more convenient than the sockets placed at hand. Do not forget about the stock - somewhere you will need to turn on the lamp or the charger from the phone.
- In the hallway and corridor sockets are placed below (so that the length of the cord of the vacuum cleaner is enough).
- Kitchen. Sockets are placed closer to the refrigerator, cooking surfaces and electric cooking cabinets. For a blender, kettle and other appliances, they make blocks of 2 sockets, just above the level of the table. Microwave, TV and hood are powered from separate or dual outlets (consider the length of the wire).
- In the bathroom with the presence of a washing machine, floor slots are installed. An open double block is for an electric shaver and hair dryer. Additional lighting or massage panels are powered by hidden blocks.

Important! For locations with high humidity, it is better to choose outlets with hinged lids and curtains covering the connectors.
Not less important question - distance from the floor. These figures are stipulated in GOSTs and other standards, but the fact is that the Soviet standards were calculated for a different amount of household appliances (and the height is bigger there), and European ones seem to be too "low".
So you have to focus on practicality and safety.
If you take a bedroom, then the best option for the outlet under the lamp will be a level of 70 cm, and 30 will be enough for chargers;
In case of kitchen Other indicators:
- 10–20 cm will be enough for a refrigerator or dishwasher (provided that the cord is not too short). The shorter the cable is, the higher the outlet is, no vnatyag work;
- sockets for other kitchen appliances endure at 1.1 m from the floor. The difference with the "apron" is in the range of 20-25 cm;
- hood will need 1.8-2 m.
 For bathroom The following figures are recommended:
- connector under the washing machine make at the level of 40-50 cm;
- 1 meter is enough for a hairdryer or electric shaver;
- if installation of a boiler is planned, all 1.5 m are taken.
Pay attention to the distance from the outlet to the shower, tap or sink - to the water source should be at least 60 cm (ideally, the meter, but not always the length of the cord). Also in the bathroom is prohibited to have sockets below 15 cm from the floor.
Did you know? In New York, on Pearl Street, the first power station in the world, created by Thomas Edison, was located. At first, residents of the street were even afraid of electricity, and children were forbidden to approach the source of light.
The number of outlets will have to be calculated in advance, taking into account the number of consumers. Indicative indicators are as follows:
- bedroom - 3-4;
- living room - 4-6;
- working area - 3-5;
- hallway, corridor - 3;
- kitchen - 4-5;
- bathroom - 2-3.
These are approximate figures that can be adjusted. Anyway, think how many and what devices will be used in different rooms.
Many put sockets with a margin (one or two "above" in case of buying new devices). 
Necessary tools and preparatory work
For installation will require:
- perforator or powerful electric drill;
- bit in the form of a crown or pobedit drill (for drywall - suitable for the diameter of the cutter);
- auger and paddle (8 mm);
- screwdrivers (straight and cross);
- pencil, tape measure and level;
- primer, putty and plaster for the final works.
- the presence of a hammer, chisel and brush will be only a plus.
 The tool is assembled, you can start. Preliminary work starts with a markup: with a tape measure mark a suitable height, and with the help of a building level with a pencil they beat off vertical and horizontal axial centers.
Important! The hole in the concrete pavement can be made with a small margin, while drywall requires precise diameter.
Leaning on and centering the underside, circle it with a pencil - the outline for the future niche is ready. In preparation for the installation of the socket block, remember about a distance of 7.1 cm - this is the standard center distance between the receivers.
Of course, you will have to temporarily turn off the electricity in the dwelling by turning off the circuit breaker on the dashboard, or by de-energizing the line going to a separate room.
Cabling
The outlet also needs to be powered from somewhere. Most often, the cables lead to not too wide pens depth up to 2 cm (they are cut down in the wall with a puncher with a spatula).
This is the best option for concrete and brick walls. The grooves are strictly vertical and horizontal, without any bends and bends. Horizontal beat higher - 2.5 m from the floor or more (if the ceiling allows).  Another technique - outdoor installationwhen the wiring is placed in external plastic ducts running along the walls. This method is suitable for work in rooms with wooden wall covering or if there is no desire to "make dust", as in the development of gates.
Did you know? According to one version, life on Earth could appear due to ... an electrical discharge in the form of lightning (supposedly they launched a global synthesis of amino acids). True, the theory has a lot of controversial issues.
Many use plastic pipes or corrugated sleeves. They reliably protect the cable, but do not look too aesthetically pleasing. Usually they are placed in the shafts, which are plastered upon completion of the work.
Work surface preparation
Properly made seat for the outlet is one of the factors that guarantee the safety and normal operation of electrical appliances. There are few variants of such works: either to change the old box or to punch through a new “nest”. Let's start with the first.
Dismantling the old box and outlet
This is a less time consuming process, which is carried out in the following order:
- Having de-energized the line, they unscrew the central screw with a screwdriver. The panel and the frame itself is removed.
- For security, make sure the line is definitely off. If there is still voltage, the indicator lamp on the screwdriver will light up when in contact with the phase. Seeing this, be sure to turn off the electrics.
- Then loosen the side spacer screws and remove the socket itself, as far as the cable allows.
- It remains to unscrew the terminals, take the wires to the side and remove the old box.
Video on how to dismantle the old outlet and install a new
Sometimes it turns out that there is simply no underbelly. The situation is corrected by installing a new one (which will be discussed a little below).
Important! If the old box at the slightest effort sank into the wall, this location will have to be strengthened with the same plaster or a small amount of cement mortar, placed in the "extra" cavity.
But even before that, inspect the wiring vacated for insulation. If she does not inspire confidence (or even worse, the old socket has melted), the wires are wrapped with a new layer. At the same time, the brush removes accumulated dust and pieces of plaster.
The arrangement of the surface under the new design
To install a new outlet will have to work hard. The most illustrative example is concrete wall. The algorithm works as follows:
- On the perforator is mounted a crown, which is made a hole. Putting it to the intended contour, they begin to make a "nest". Its depth should be 4-5 mm greater than the height of the bottom plate.
- If there is only a drill at hand, there is another way out - 10-12 holes are drilled around the circumference, the jumpers between which are carefully knocked down with a chisel.
- Carefully clean the dust from the strobe, try on the box. With it, pre-cut plugs for wiring. All is ready.
It seems to be simple, but there are some subtleties. First, get ready for the fact that there will be a lot of dust. Secondly, you have to hold the tool firmly in the right position - there should be no distortions.  For plasterboard wall the sequence is the same. The difference is only in the tool (quite sharp cutters on the drill) and effort. The material is fragile, and there is no need to press hard. Forgetting about this, sometimes they get not only a hole, but also cracks.
Did you know? In the fire station of the city of Livermore (USA) there is a light bulb that has been working almost continuously for more than a century, since 1901.
In the case of blanks under double sockets it is important to calculate the axial centers and the exact horizontal. The "socket" obtained using the same technology is checked by removing connecting jumpers from the boxes.
Installation of a bottom plate
The place for the boxes is ready, when the test podrozetniki themselves stand up without any distortions - you can start installing them in concrete wall:
- After removing dust, apply a primer.
- When it has dried, dilute the plaster or plaster based plaster mixes (although alabaster will do). Immediately put a small layer of the compound inside the holes - the plaster dries quickly.
- Distribute a layer more or less evenly, with a narrow trowel.
- Run the wiring into the holes in the “glass” case, and press the box into the solution (the upper edge should be flush with the wall). To set the underside equally, at this stage a level is taken, which is checked horizontal.
- After that, tighten the screws that hold the entire structure. Inserted pieces of the solution are removed later when they harden.
- Ground the external joint with the wall, ground, plaster, and when it is dry, grind and sand to obtain a flat surface.
Video: how to install a sub-wall in a concrete wall
WITH drywall This is not the case - the preliminary laying of the solution is usually not done. On the other hand, caution is needed: excessive diligence is fraught with the fact that the edges of the hole are cracked, and the box will enter there, having lost the lateral point of support.
In addition, for drywall, special flush-mounted caps with flexible locking ears on the sides are used.
Important! It is desirable that a voltage regulator is connected to the common network of the dwelling - the device is quite expensive, but effective.
Post preparation
All three (in old houses - two) the conductors of the cable inserted in the box will be laid separately. To find out exactly how they will be placed, carefully cut off the protective sheath.
Having separated the freed veins, they are brought to the socket terminals. This will show how much wire needs to be cut (usually 6-7 cm of margin from the edge of the bottom plate is left).
The wiring itself is carefully cleaned, removing 1-1.5 cm of the sheath from the edges. The tips of the wires twist in a ring clockwise - this will increase the contact area. Make sure that the individual "hairs" do not stick out.  When replacing the box, sometimes there is a problem with the wiring - it may be interrupted at the ends, or it is necessary to connect the copper conductor with the aluminum one. In such cases, helps out transition terminal. This is a good option for those who want to insure in case of loss of contact.
Did you know? The first written references to electric shocks are dated to 2750 BC. In ancient Egyptian texts, the scene of fishing for an electric catfish is described (and he is able to give a 360 V pulse).
Put it like this:
- The tips of the veins are trimmed. Insulation is removed by 5 mm, and the wiring is set parallel (without twists).
- The pads are worn so that the wiring protrudes approximately 0.5-1 mm. The cuff should cover the edge with insulation.
- The tips on both sides are tightened with pliers, and the wires themselves are clamped with a clamping screw.
A little time consuming, but reliable. The main thing - to put the terminal in the box (but not in the plaster).
Outlet connection
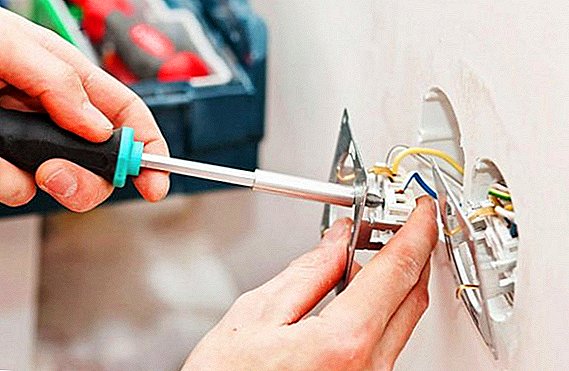
The scheme of connecting the outlet to the three-core cable is quite simple:
- The yellow-green wire (ground) is attached to the center terminal.
- Blue or blue-white "zero" is fixed on the left terminal.
- To the right, the phase is removed and fixed (white or white-brown wiring).
 As you can see, there is nothing tricky: the cleaned ends are firmly grasped with ordinary screw or spring terminals. In houses with old cables without a ground lead, the principle is the same.
Dual outlet, made by one unit, connects differently. "Earth" is attached only to the upper terminal, Phase and "zero" are displayed on the left and right terminals (in no case on one plate - this will lead to a short circuit).
Outlet installation
Making sure of the correct connection and reliability of the contacts, the wires are gently bent and placed together with the socket in the box. At the same time try not to pinch the wiring.
Important! When installing, make sure that the wiring does not touch each other.
Then the mechanism is fixed with side screws. It is necessary to check how exactly the outlet is, and whether there is a skew in the vertical plane. When working with concrete walls do not need to press with all his might, otherwise the mount runs the risk of bursting. The same situation with drywall.
Latch fixing
It remains to exactly set the frame and grab it on the side screws. The final part of the work - the installation of decorative linings. They should be worn easily, without obvious bulging. The fastening is the central screws. 
What to do if the box is set crookedly
Situations are different, and the error when installing the "glass" - is no exception.
The most correct (but at the same time and time-consuming) method of correcting it is to remove the plug, not forgetting to look at the installation if it does not play on the cable that came out of the vertical groove.
To avoid this, they make it a little deeper in this area.
Of course, all planes and wiring during such a forced replacement are checked.
Did you know? In different parts of Japan, the current is supplied to networks with different frequencies: in the eastern networks - the standard 50 Hz, and in the western - 60. This is due to the development of energy in the country: at the beginning of electrification, different equipment was purchased, and later it turned out that unification would require enormous costs .
For those who have a wall insulated with foam blocks, and it is impossible to move the socket a little because of the lack of space for a secure mount, another solution will help:
- remove the cover from the de-energized socket;
- in the frame (as close as possible to the body), drill holes 3-3.5 mm in diameter, and self-tapping screws are inserted there;
- after the socket is set up normally, everything is fixed back.
A handicraft method, but effective. Just do not forget to check the contacts.
Features of the installation of dual outlets
For a modern home with an abundance of household appliances, double sockets are often used. But practice shows that the popular "jumper" in one podozetnik desirable to replace the parallel connection of two outlets (with the eyeliner cable for each) - so they are better able to cope with the loads.
Video: how to install a double outlet
Even before installation, you need to calculate the load on the device: it should not exceed 16 A.
When installing the bare ends of the wires it is desirable to solder, and even better - use brass contacts. This will extend the life of the dual systems.
Video about where to install sockets in the apartment
Now you know how to install the socket with your own hands, and what you need to consider when working.
Very often, uninvited guests appear in apartments and private houses, which cause a host of problems for the owners. Learn how to deal with bedbugs, cockroaches and moths.
We hope this information helped to understand such a serious matter, and the wiring will work without problems. And let any manipulations be successful!