Any happy owner of a country house or a plot of land sooner or later faces a tough need for additional outbuildings, the best option is a barn.
Some summer residents are inclined to believe that the value of the sheds is overestimated and it is enough just to do without them, but over time, the majority of people understand that they need a shed, even if the dacha is used exclusively for recreation.
 If the garden plot does not grow garden trees, vegetables, and even if the gardener does not breed chickens, geese, turkeys and other living creatures, the barn will certainly be in demand as a good storage place for barbecue, hammocks, country furniture and other things.
That is why it will be useful for everyone to know which shed to build and how to build a warm shed cheap. Given the simple and clear recommendations, any summer resident will be able to build a high-quality, reliable and durable barn on his own site.
Do I need a barn in the country
Intending to build a barn in his own summer cottage, it is necessary to immediately determine its purpose. Having a big house at the dacha, you may get the feeling that there is no need for a barn, but this is far from the case - in most cases the barn is simply indispensable.
This is not surprising: the barn is one of the most important structures of the agricultural bloc. It can be used for breeding animals and birds, as well as storage for country equipment. Moreover, in the barn you can organize a small workshop. However, along with this you should not turn this room into a shack and do it without the proper approach. Initially, you should build a good barn.
Did you know? Often, the sheds on the dacha sites are built even earlier than the main residential house. This is due to faster erection and sufficient capacity.
The choice of materials for the dacha barn
 To date, the building materials market is replete with a variety of options and offers. In view of this, almost every summer resident, conceiving the construction of a shed, must responsibly choose materials for a dacha shed.
Any specialist can easily answer from which it is inexpensive to build a shed for animals and / or country equipment, but each of the building materials is rather peculiar and has a number of advantages and disadvantages that cannot be ignored.
Pros and cons of a wooden shed
Wood is considered to be the most acceptable and popular building material for the construction of a country house. This material is widely available, cheap and does not require work skills.
- Wood sheds advantages:
- Cost This advantage is fundamental for the majority of summer residents who undertake construction. The construction will be cheaper than a shed of other materials.
- Low weight. The process of building such a barn does not require preliminary preparation and creation of the foundation. Due to the low weight of the whole structure, a small base is usually sufficient.
- The speed of erection. You can build a wooden shed yourself in just a few days. At the same time, the reliability of the material will allow such a shed to stand for more than a decade.
- Disadvantages of wooden sheds:
- The need for processing. Wood must be protected from moisture, low temperatures, pests, decay and other hazards. Processing a large amount of timber entails an increase in financial expenditure.
- Shrinkage. As a result of wood drying, cracks, chips and other defects often appear.
 There is no particularly critical flaws in the wood, therefore, to build a hozblok do it yourself, Which drawings are already there, practically everyone can.
The choice in favor of such material is most justified and obvious.
Advantages and disadvantages of the foam block shed
Foam block - not the most popular building material used for the construction of the shed. However, if there are reasons for the inability to use other materials, you can safely resort to the choice of foam blocks.
 The foam block shed differs in a solid, capital type. This structure does not require additional finishing, since it initially looks decent. It is noteworthy that the foam blocks do not need to be insulated and protected from exposure to environmental factors, as is the case with wood.
- The advantages of building foam blocks:
- Cost Of course, compared to a tree, a similar shed is more expensive, but compared to the cost of materials for the construction of a metal or brick shed - the foam block is quite affordable.
- Comfort erection. For the construction of the shed of foam blocks does not require any experience, and the construction takes a minimum of time.
- Durability and durability. Due to the high strength of the foam block is often used for the construction of residential buildings, so do not worry about the reliability of the barn. The strength of the material will be sufficient for the construction of two-and even three-story buildings, not to mention a simple barn.
- Heat resistance. For this characteristic, this building material has no competitors. Foam concrete laid in a single layer is comparable in thermal conductivity with 80 centimeters of brickwork. This is a guarantee of warmth and comfort in the barn.
- Protection. Foam concrete is initially protected from a number of factors, so it does not need to be further processed.
Did you know? The porous structure of foam concrete, which distinguishes it from other building materials, provides low thermal conductivity, high strength, sufficient even for multi-storey construction, as well as effective noise absorption.
- Disadvantages of foam concrete sheds:
- The need to create a reliable foundation. For example, a wooden shed can be made without prior preparation and additional time and financial costs. Foam concrete shed should be built solely on a high-quality, reliable foundation that has survived for at least 2-3 weeks.
- Significant shrinkage.
 The choice in favor of this material is obvious only if it is impossible to use other materials. However, in the case of erection of a foam concrete shed, its reliability, quality, protection and durability will certainly delight any summer resident.
What are the advantages of a brick shed
 Cases of construction of barns from bricks are quite rare, since this material is not particularly suitable for these purposes. A variety of building materials allows you to build sheds more practical and cheaper, but in any case it is worth knowing the advantages and disadvantages of brick sheds.
- Advantages of brick sheds:
- Durability. Such buildings are not at all terrible climate change and environmental impacts. In such a barn you can easily equip a workshop and storeroom for garden tools. It is noteworthy that brick sheds do not need to be further processed and protected.
- Reliability. The strength of the brick does not cause doubts, in view of which, by building a brick shed on your own summer cottage, you can be sure that the room will stand for many years and will be able to reliably protect the entire contents.
- The disadvantages of brick buildings:
- Foundation. For the construction of brick sheds it is imperative to create a solid foundation, as well as for foam concrete. In the case of, say, a tree is not required.
- Cost The price of this building material is unreasonably high. Construction of a barn from any other material will be significantly cheaper.
- Thermal conductivity. In order to ensure a sufficient level of climate protection, the required thickness of the brickwork should be from 50 to 80 centimeters.
- Weight. A brick is a rather heavy material, which makes it significantly difficult to transport, accompanied by additional financial expenses.
Use of a professional flooring at construction of a shed
 Collapsible designs of frame sheds, as a rule, are made using metal and / or plastic. More durable material, of course - metal. Use of a professional flooring at construction of a shed does not demand special skills and special tools.
This option is chosen by gardeners, for whom the main factor is the speed and ease of construction, combined with low cost material.
- Advantages of a shed from a professional flooring:
- Cost Such frame structures are the cheapest and simplest. Any known options for the construction of a barn at the dacha are often more expensive than building a barn with corrugated flooring.
- Practicality. This building material does not need further processing, is not afraid of temperature changes, rain, fire and pests. The option is truly unique in this matter.
- Strength. The reliability of the metal shed is sufficient to ensure durability and protect the contents.
- Transportability. Frame metal sheds, as a rule, can be assembled and disassembled, which makes it possible to move them freely within and outside the suburban area.
- Presentable appearance. The metal shed, undoubtedly, will become the pride of any summer resident, since the professional flooring looks quite elegant and neat.
- Disadvantages of a metal shed:
- Thermal conductivity. The metal frame shed is unsuitable for use in the cold season.
- Durability. Separate brands of metal sheets are unsuitable for use during the construction of the shed. Therefore, you need to carefully choose the material, making a choice not only in favor of thicker sheets, but also pre-treated from corrosion.
- Lack of flooring. Sheds from profile sheets are usually erected without a floor, which causes a number of difficulties. Sex flooring can also be done independently, but this entails additional financial costs and increases the duration of the installation work.
 Sheds of this type should be used when it comes to seasonal use of buildings and the need for prefabricated structures. Along with many advantages, a small number of shortcomings is not decisive, and therefore, metal sheds are often being built in suburban areas even now.
How to build a barn in the country with their own hands (foundation, frame, trim, roof)
The process of building a barn in their own summer cottage is very responsible and requires a reverent approach and verified actions. It is at this stage that the final result, the quality and durability of the building, are largely predetermined.
It is noteworthy that for each chosen construction option a different set of building materials and tools will be needed. In order to make the construction process more simple and any summer resident understands how to build an economical animal shed, it is enough to take into account the simple recommendations below.
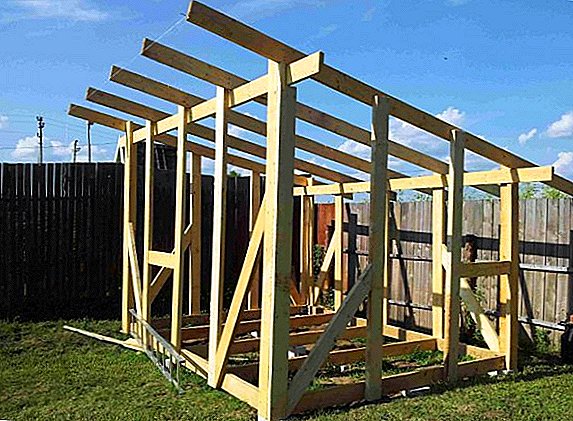
What you need and how to make a frame barn
Surely every person knows that the metal is rightfully considered the most durable and durable building material, especially if you compare it with wood, which is quite simply destroyed under the influence of environmental factors and climatic conditions. However, along with this it is impossible not to note that wood is more preferable when it comes to ease of installation of the structure, its processing and final cost.
 The construction of a wooden frame with the use of timber, as a rule, takes no more than a couple of days, and for this it is enough to have a small set of building materials and tools: boards, bar, fixing hardware and assembly corners.
It is important that there is no need for a foundation for a frame shed, since the assembly can be carried out on a previously carefully prepared site.
Did you know? In order to avoid contact of the base of the frame shed with the ground it is allowed to install the shed on concrete blocks. In this case, the blocks must be placed taking into account the distribution of the weight load.The presence of the truss system is not necessarily quite enough for a shed roof, which is a series of transverse beams and a sheathing that is covered with soft slate. The frame shed is unusually convenient because many well-known companies of the construction market are engaged in the full production cycle of all the necessary components.
Thus, any summer resident who wants to build a barn on his own plot and is ready to pay a certain amount for it can simply make a choice in favor of one or another of the business units proposed by the catalog. Moreover, it is possible to assemble such a frame shed on your own, having only the project of a shed from the manufacturer.
- Assembling the base of the barn.
At the stage of preliminary preparation of the terrain, it is necessary to create an absolutely horizontal platform, checking it with a long level.
 This can be done with the help of mechanized equipment or by tamping the soil, pre-moistening it.
It is recommended to pour a layer of gravel and sand over the created platform, thereby increasing the stability and reliability of the soil, as well as protecting it from sinking.
Important! Starting to build a barn with his own hands, drawings and a list of building materials must be originally. This is due to the fact that already at the first stage it is necessary to understand the overall dimensions of the shed, which is reflected in the required number of basic and consumable materials.Having determined the perimeter of the shed being erected, it is necessary to install concrete blocks on its corners and also in the center. The assembly of a wooden frame from a bar with a cross section of 150x150 mm begins directly on these blocks. Alternatively, you can make a barn out of a shaped pipe with your own hands, but creating a skeleton of such a structure requires certain skills in working with the welding machine. The metal frame can also be made collapsible, but in this case, the complexity of the preparatory work increases significantly.
Did you know? To increase the stability and reliability of the construction of the frame shed in the concrete blocks of the base, you can drill holes and fix the frame with anchor bolts.
 The next stage is going to lags for further laying out the floor. As the crossbars installed inside the frame, the bar is used 150x100 mm. To fix the lags you need a metal corner of the appropriate size. The beam is laid at a distance of not more than half a meter from each other and fixed with corners.
It is important to check the flooring horizon. The flooring itself can be laid already at this stage or at the end of the building, however, in the case of the first option, it is necessary to leave enough space (about 100-150 mm from the edge) to install the wall framework.
- The construction of the walls of the barn frame type.
With the help of a construction plummet on the corners of the shed being erected, it is necessary to expose vertical pillars, which are used for the bar 100x100. In order to ensure their durability, the racks need to be fixed with braces and metal corners to the base frame. The upper parts are fixed strapping. Along the perimeter of the floor rack can be installed without a certain step, independently determining the places and dimensions of the door and window openings. The main landmark is the size of the cladding sheet, since its fixed edge and the seam between the sheets should fall on the stand.
 The front pillars should be higher than the rear ones, because this way a slope of a further roof is created. It is mandatory to take into account the orientation of the internal and external cladding materials: their vertical location predetermines a greater number of vertical crossbars.
Wall cladding can be done in one or two layers. The shed according to the draft of the first variant is colder and wetter. The second option, in turn, involves the use of insulation, and such a barn will be more warm and resistant.
That is why the single-layer outer skin of the frame barn walls should be done more carefully, preferably with sheet over sheet. In both cases, you need to use waterproofing.
The inner lining is made of fiberboard, mounted on top of insulation and waterproofing. In addition, as a plating, you can use a profiled board or moisture-resistant chipboard, which can also be used for flooring. Often the walls of frame sheds sheathed clapboard. This is especially true in cases where the room will be equipped with a workshop, summer kitchen or even a garden house.
 As a heater, it is desirable to use polyfoam, mineral wool, basalt fiber or flax fiber. Installation of external and internal lining is carried out using stainless self-tapping screws. The cladding boards should be measured in such a way that at the corner joint the front boards cover the ends of the side panels, since in any case a special corner will be printed on top.
The inner lining panels are attached first at the corners, and only then around the entire perimeter. Their joint must be strictly vertical or fall on a horizontal beam of the frame. It is extremely important to make a tight fit, avoiding the cracks. When mounting the frame of the side walls, the top of the pillars must be cut with due regard to the required slope of the roof.
Important! Before starting the skin of the frame, it is advisable to mount the boxes of door and window openings to determine the shape and dimensions of the skin sheets. Directly frames, windows and doors are installed only after the completion of the rough finish of the shed.
- Laying the roof frame shed.
 On top of all vertical uprights of the frame, the trim frame, which is made of 150x100 mm bar (150 mm at the base), is initially laid out and fixed with a metal corner and hardware. On top of the frame are installed cross-beams (bar 150x100 mm) with a half-meter pitch. Since the height of the front racks is greater than that of others, the roof beams will form a slope towards the rear wall of the shed being erected.
Next you need to put a waterproofing, on top of which, regardless of the selected roofing material, the crate is mounted, from above you can lay either a ruby period with a further covering with a profile sheet or metal tile, or a soft roof. It is noteworthy that a regular board or a 50x50 mm bar can be used for the batten. The cell size of the batten can be chosen arbitrarily, but not too small to eliminate unnecessary costs for building materials.
In the same way, the internal lathing, intended for laying the ceiling, is stuffed. Fixing of timber or planks should be carried out with the help of long nails, carefully deepening their caps completely to prevent any interference with the further installation of the roof.
In order to obtain a durable and reliable shed, it is strongly recommended to insulate all its walls, floor and roof. After the insulation of the room, the construction can be considered complete, and the matter remains only for its rough and fine finish.
Thus, a cheap frame-type shed can be erected on its own, costing no more than 3-4 days and a minimum of building materials.
How to build a shed of foam blocks or bricks
Despite the relatively high cost of foam blocks and bricks, you can reduce the cost of construction by refusing the construction team, taking up the construction site personally. Creating a brick structure, as a rule, does not cause any particular difficulties even for people who do not have much experience in construction.
Such a variant of the construction of the shed is more expensive, and the process of construction takes more time, but the reliability, durability and durability of the brick shed is incomparable with other versions (wooden or metal shed).
In order to quickly, efficiently and economically build a barn with your own hands out of brick, simply follow the advice and recommendations for construction at each stage.
- Foundation.
 At the first stage, it is necessary to prepare the foundation, create a formwork and pour concrete. Before you install a barn, you need to designate its dimensions on the ground in accordance with the plan, outlining stakes.
Over the entire area of the future construction it is necessary to remove the soil evenly before forming a horizontal plane.
In the direction from the peg to the peg you should dig a trench to a depth of half a meter. Drainage consisting of sand, gravel and rubble is poured at its bottom. Over it the reinforcing grid is established and the timbering is created.
The next step is to mix the concrete (fine clean sand, cement and water) with thick sour cream consistency. The prepared concrete is poured in previously prepared trenches and left to dry completely.
Important! Concrete reacts poorly to extremely high and extremely low temperatures. For example, at high temperatures outside for the first few days, it is necessary to wet the foundation with water in order to protect it from cracking and thereby increase its durability.
- Walling.
 At this stage, compliance with all recommendations and rules allows you to eliminate any problems and difficulties. Initially, it is necessary to determine the location of the door and window openings. Walls should be built on a pre-laid waterproofing layer. To reduce the butt layers, it is strongly recommended to use a mixture based on sand and cement.
With the direct construction of the barn you need to start from the corner. Each stage of the work should be accompanied by checking the level and angle of the masonry. Bricks or foam blocks should be mounted and fastened to each other with concrete, which is about 1 centimeter thick.
Due to the strong shrinkage of the installation mixture, the applied layer of concrete should be about 2 centimeters. Apply it evenly, forming a small mound. If necessary, the blocks can be cut to the desired size. Thus, carefully laying down row by row and controlling their level, the walls of the shed are erected.
- Roof construction.
 The final stage is the construction of the roof. This can be done quite simply and cheaply if you make a choice in favor of more affordable roofing materials. As the base of the structure, you need to use a guide bar on which the floor beams are installed. The most reliable longitudinal section of the beam is 100x100 or 150x150 mm.
The props are vertical racks installed closer to the center. The roof must be mounted overlap on a previously prepared base. Installation should be slate dowels or stainless steel screws.
Concrete dries for about 4-5 days, so before finishing and arranging a brick shed you need to wait about a week. Such an outbuilding is durable, reliable and perfect for use as a shed, storage for inventory and even for temporary housing.
A shed is an indispensable farm building, which must certainly be on every household plot and cottage. It is difficult to overestimate its importance because of the existence of a wide variety of uses. Regardless of the scale of capital construction, almost everyone is able to build a barn with his own hands, simply taking into account the rules and recommendations for such a construction.