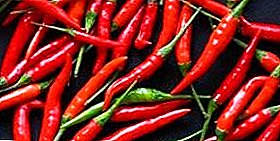
Chili is a spicy, fragrant fruit that is part of many dishes.
In order to always have it on hand fresh, it is possible to grow chili peppers on the windowsill.
And so consider all the nuances of how to grow chili at home.
Choosing a grade
The following varieties are suitable for growing in the house:
- Treasure Island;
- Swallow;
- Sweeties;
- Firstborn;
- Siberian Firstborn;
- Peppercorn for the boss.
All these varieties are small-leaved, and therefore they feel great when grown on a windowsill, where, unlike open air, there is little sunshine.
In addition, the listed varieties are self-pollinated, which means they can produce fruits in the room.
Seed preparation
Before sowing, seed treatment is necessary. manganese solution or growth stimulants. The seeds are immersed in the solution for 20 minutes, then the water is drained through a fine sieve.
- Seeds are placed in a damp cloth. and leave for germination for a week in a warm place.
- The cloth must be moistened periodically.to prevent seed drying.
- As soon as the seeds seem sprouts, sowing is carried out.
IMPORTANT. Do not unfold the cloth to check seed condition. Earlier than in 6-7 days, the seeds will not spill, but when disclosing they will cool.
Soil composition requirements
 A mixture is prepared for sowing chili peppers clay, sand and humus (1Х1Х2). Stir the mixture thoroughly with water.
When using the finished soil, it must be held in the room for a couple of days for oxygen enrichment and warming up.
Suitable specials. soil for pepper and tomatoes.
How to plant chili seeds from home seeds
- Planting for seedlings produced in wide shallow containers at a distance of 5 cm in the row.
- Seeds are laid out on the surface, then sprinkled. a thin layer of soil (0.5-1cm).
- From above crops moisten from a spray.
- Boxes with crops cover with a film or glass to create greenhouse conditions. For germination seeds need a temperature of 22-25 degrees.
The first shoots will appear in 10-15 days. The film must be removed immediately, and the air temperature lower to 18 degrees for a few days.
Seedling care
 A light day for the sprouts must be at least 12 hours. Therefore, when growing in winter, illumination with special phyto or fluorescent lamps is necessary.
The boxes are placed on a light, but without sun, a place.
In the phase of two or three true leaves, pepper is necessary swoop down a distance of 10-12 cm. When picking pinch off the main root by a quarter. Such a technique helps build a powerful root mass of each plant.
Pepper pick before the formation of two true leaves is not recommended, because at this time the shoots are not yet able to transfer the transplant.
It is also impossible to delay with a pick, because from a lack of lighting the plants will stretch and weaken.
IMPORTANT. When picking do not bury the sprouts of pepper below the level that was during the shoots. Unlike tomatoes, the side roots of the stem of the pepper does not form, and when dredging the roots will suffer from lack of air.
To have chili seedlings you need to Southeast or southwest windowsThat is how you can provide optimum lighting to the pepper. The lack of lighting can be judged by the color of the leaves. If they are dark green, then the sun is enough for the pepper. On the lack of light signal faded, light leaves.
Water the pepper should separated water temperature of 22-23 degrees. When watering no overmoistening, from this plant will get sick with a black leg.
If the humidity in the room is less than 50%, it is necessary to spray the leaves with warm water.
Pepper Transplant in Pots
When the seedlings reach a height of 10-15 cm, the plants are placed in separate pots for rearing and harvesting. Each copy is planted in a separate pot.
The most suitable dishes are plastic containers rather wide, but not too deep. The use of ceramics is not recommended because the soil in such a pot will dry out too quickly.
- At the bottom it is necessary to lay a drainage layer of at least 3 cm.
- Then pour the soil mixture for peppers into the pot.
- Sprouts are planted on the same level as when growing seedlings, without deepening the stem.
- Each sprout with a lump of earth is placed in a well prepared in the soil and sprinkled with soil.
- After planting, the soil around the stem is well crushed and watered.
- The next watering after planting is carried out no earlier than 7 days, when the roots begin to take root.
IMPORTANT. Before rooting, do not moisten the soil unnecessarily, from this the root system, not yet able to absorb water, will begin to rot.
Formation and pollination of the bush
 Final rooting and the beginning of the growth of bushes will begin in 15-20 days. At this time, the pepper will begin to actively form new shoots. Masking a pepper grown on a window sill is not required.
Its fruits are small and the bush has enough strength to grow them. There is also no need to put any supports, the pepper stalk is powerful enough to withstand a lot of fruits.
As soon as flowers start to form on the bushes, branches need a little shake for pollination of buds. Daily turn the bushes the other side to the window for even development.
Feeding rules
Fruiting cultures are demanding on the content of food when grown, so the pepper must be regularly fed. 2-3 times weeks water the soil with a universal fertilizer for vegetable crops or special for peppers and tomatoes.
Fruiting chili pepper
As soon as the pepper begins to form fruit. Bushes, covered at the same time with flowers and fruits, acquire a special decorative effect. When sowing in winter, first peppers appear in May - June. Depending on the variety they have red, yellow or green color.
IMPORTANT. Do not forget to select and dry some of the most beautiful specimens to receive seeds for planting next season.
Growing chili peppers in room conditions does not require any special effort. Give him a little attention, and he will delight you with sharp, fragrant fruits.
REFERENCE! Learn about different methods of growing and caring for peppers: in peat pots or tablets, in open ground and without picking, and even on toilet paper. Learn the cunning method of planting in the snail, as well as what diseases and pests can attack your seedlings?
Useful materials
Read other articles on pepper seedlings:
- Proper cultivation of seeds and whether to soak them before sowing?
- How to grow black pepper peas, bitter or sweet at home?
- What are growth promoters and how to use them?
- The main reasons why the leaves are twisted at the shoots, the seedlings fall or are pulled out, and also why the shoots die?
- Terms of planting in the regions of Russia and especially the cultivation in the Urals, in Siberia and the Moscow region.
- Learn yeast based fertilizer recipes.
- Learn the rules of planting Bulgarian and hot peppers, as well as dive sweet?
In conclusion we offer you a video on growing chili peppers at home: